10 Jul 2016
Linux’s socketcan driver is a good
way to interact with a CAN network in Linux. As of Python
3.3,
socketcan support is built into Python’s socket module, allowing you to use
socketcan from Python directly. This makes it very easy to write scripts to
send, receive, and analyze CAN data.
Starting With Socketcan
One of the best things about socketcan in Linux is that you can experiment with
it without spending money on a CAN adapter. Assuming you are using at least
Ubuntu 14.04, socketcan is built right into the kernel and the
tools to work with it are available
as an apt package:
apt-get install can-utils
cansend --help
You can also create a virtual CAN interface with the “vcan” driver:
modprobe vcan
ip link add vcan0 type vcan
ip link set vcan0 up
With this you can already send and receive CAN packets on your virtual CAN
network. Try this by running candump in one terminal and sending CAN data with
cansend in another:
cansend vcan0 012#deadbeef
This capability will come in handy later to test your Python code.
Creating a CAN Socket
The first step to CAN communication with Python is creating a CAN compatible
socket and binding it to your virtual CAN interface:
import socket

sock = socket.socket(socket.PF_CAN, socket.SOCK_RAW, socket.CAN_RAW)
sock.bind(("vcan0",))
However, the bind call may raise an exception if the interface you’re trying
to bind to doesn’t exist - it’s a good idea to handle this:
import socket, sys

sock = socket.socket(socket.PF_CAN, socket.SOCK_RAW, socket.CAN_RAW)
interface = "vcan0"
try:
    sock.bind((interface,))
except OSError:
    sys.stderr.write("Could not bind to interface '%s'\n" % interface)
    # do something about the error...
Communication
In python, every CAN packet is represented by a 16 byte bytestring. The
first 4 bytes are the CAN-ID which can be either 11 or 29 bits long. The next
byte is the length of the data in the packet (0-8 bytes) followed by 3 bytes of
padding then the final 8 bytes are the data.
A good way to pack/unpack the data is Python’s
struct module. Using
struct’s syntax, the format can be represented by:
Sending CAN Packets
Sending a packet using the previously opened CAN socket requires packing the
packet’s CAN-ID and data using the above format, for example to send “hello”
with the CAN-ID 0x741:
import struct

fmt = "<IB3x8s"
can_pkt = struct.pack(fmt, 0x741, len(b"hello"), b"hello")
sock.send(can_pkt)
If sending a CAN packet with an extended (29 bit) CAN-ID, the “Identifier
extension bit” needs to be set. This bit is defined in the socket module as
socket.CAN_EFF_FLAG:
can_id = 0x1af0 | socket.CAN_EFF_FLAG
can_pkt = struct.pack(fmt, can_id, len(b"hello"), b"hello")
sock.send(can_pkt)
Receiving CAN Packets
Receiving CAN packets uses the sock.recv method:
The contents of the packet may be unpacked using the same format. Because the
first three bits of the resulting CAN-ID may be used for flags, the returned
CAN-ID should be masked with socket.CAN_EFF_MASK. For a normal CAN packet the
body will always be 8 bytes long after unpacking but may be trimmed to the
actual length received based on the length field from the packet:
can_id, length, data = struct.unpack(fmt, can_pkt)
can_id &= socket.CAN_EFF_MASK
data = data[:length]
Putting it All Together
With these simple pieces it’s now possible to create a Python application that
participates in a CAN network. I’ve created a simple command line utility that
uses Python to send and listen for CAN packets:
./python_socketcan_example.py send vcan0 1ff deadbeef
./python_socketcan_example.py listen vcan0
The source code can be found on my
Github.
07 Feb 2014
iOS Segues are an elegant solution to implementing animated transitions between
storyboard views in an iOS application. When using the standard segues they
allow beautiful transitions with zero code. But What if you want a different
animation or behavior in the segue?
Custom segues to the rescue! Unfortunately I’ve had a hard time finding
tutorials that cover using custom segues end-to-end (i.e. triggering the segue,
loading the new view, and finally unwinding). This post aims to remedy that a
bit in addition to providing a few tricks for working with segues.
First Thing’s First
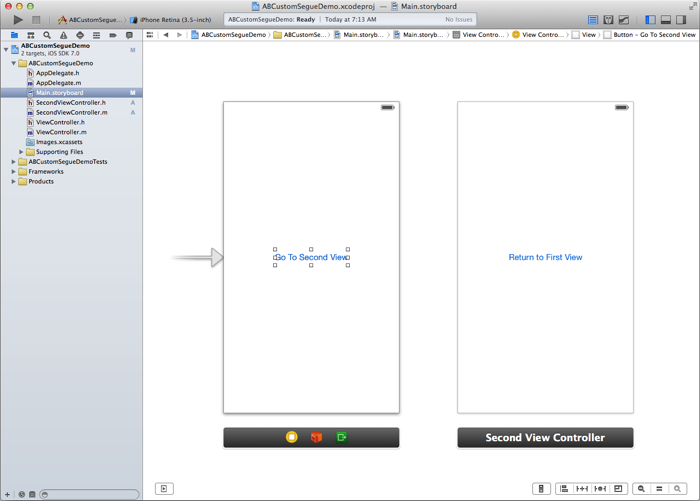
Let’s start with a simple XCode project with two view controllers. Create a
new “Single View Application” and add a second view controller class using
File->New->File.... The new class should inherit from UIViewController. A
second view controller also needs to be added to the app’s storyboard and its
Class property set to the name of the new class (SecondViewController).
Since we need something to click/tap on, add a simple button to each view
controller as well.
The Custom Segue
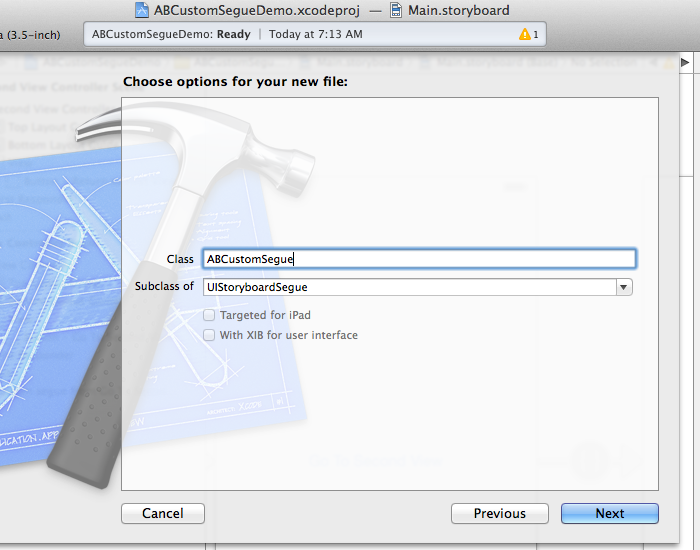
Next, the custom segue itself needs to be created. Once again, we can add a new
class for the custom segue using File->New->File... in XCode. This time the
class should inherit from UIStoryBoardSegue.
In general only the perform method needs to be implemented in a custom segue.
If you want the segue to carry some data, properties may be added as well.
For our purposes, this segue will simply implement a custom slide animation.
// ABCustomSegue.m
- (void)perform
{
  UIView *sv = ((UIViewController *)self.sourceViewController).view;
  UIView *dv = ((UIViewController *)self.destinationViewController).view;

  UIWindow *window = [[[UIApplication sharedApplication] delegate] window];
  dv.center = CGPointMake(sv.center.x + sv.frame.size.width,
          dv.center.y);
  [window insertSubview:dv aboveSubview:sv];

  [UIView animateWithDuration:0.4
    animations:^{
        dv.center = CGPointMake(sv.center.x,
                dv.center.y);
        sv.center = CGPointMake(0 - sv.center.x,
                dv.center.y);
    }
    completion:^(BOOL finished){
        [[self sourceViewController] presentViewController:
			[self destinationViewController] animated:NO completion:nil];
    }];
}
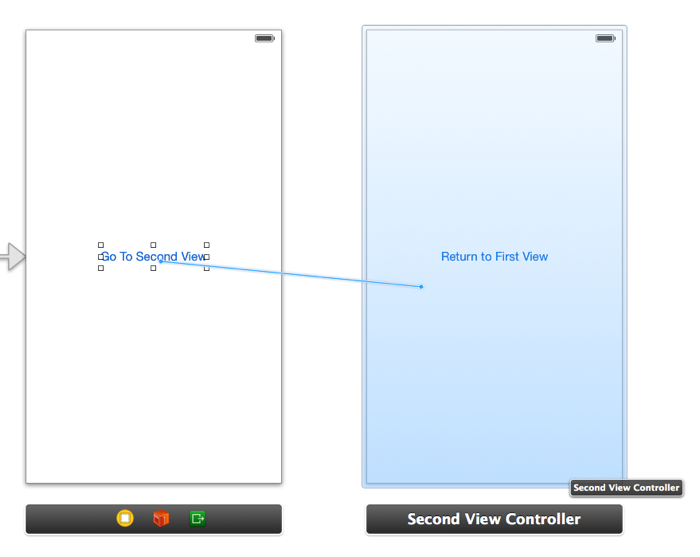
Pretty straightforward. Now it’s just a matter of adding the segue to the
storyboard. This can be done in the usual way - by Ctrl dragging from the
button that triggers the segue to the second view controller.
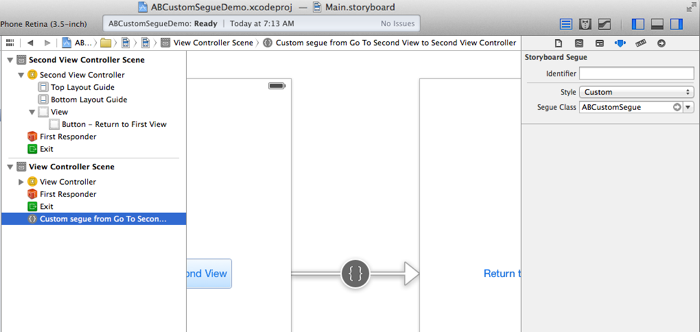
Finally the segue needs to be configured to use our custom class. This is done
from the attribute inspector for the segue. Set the Style to Custom and set
the Segue Class to the name of our new segue.
You can now test the segue by tapping on the “Go To Second View” button. The
second view should slide in from the right.
Unwinding the Segue
To return to the first view from the second view, we have to unwind the segue.
As an extra challenge, let’s do it programatically.
Before we can unwind, the first view controller needs to implement a handler
for returning from the second view.
// ViewController.h
- (IBAction)returnedFromSegue:(UIStoryboardSegue *)segue;
// ViewController.m
- (IBAction)returnedFromSegue:(UIStoryboardSegue *)segue {
    NSLog(@"Returned from second view");
}
Next we need to create the unwind segue. Since we want to trigger this segue
programatically, we’re not going to Ctrl drag from the “Return…” button to
“Exit” as we usually would. Instead we will Ctrl drag from the second view
controller to “Exit”. This rather unintuitive method for creating an unwind
segue is useful to know when the segue is not going to be connected to any
UI controls directly but is being triggered only programatically.
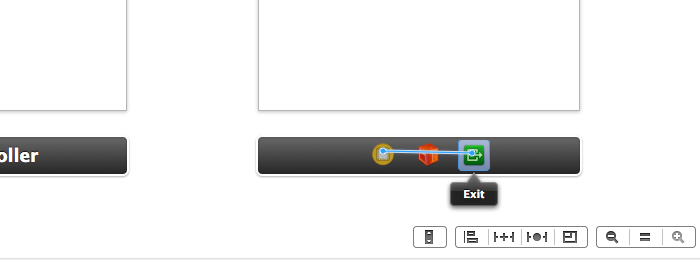
You will see the usual popup asking you to select a handler for the unwind.
Select the returnedFromSegue method we just created.
To trigger the unwind programatically we need to give the unwind segue an
identifier. Select the unwind segue in the storyboard and set the identifier to
“UnwindFromSecondView”.
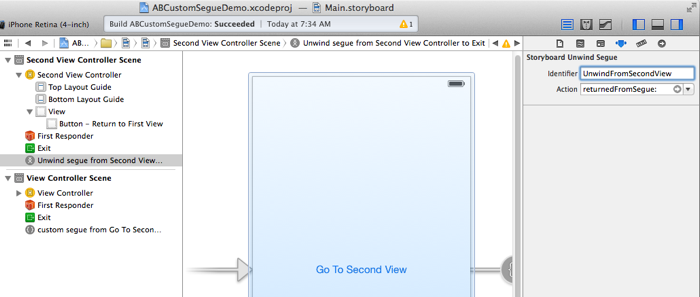
Next create an action for the “Return to First View” button. Ctrl drag from the
button to somewhere in the SecondViewController.m file (the Assistant
editor is useful here) and create an action called returnToFirst. The
implementation of this action is very short and simply invokes the unwind segue
created above.
// SecondViewController.m
- (IBAction)returnToFirst:(id)sender {
    [self performSegueWithIdentifier:@"UnwindFromSecondView" sender:self];
}
At this point you should be able to segue to the second view and back again
using the buttons. Note however that the unwind segue does not slide the second
view back to the right nicely. Instead the second view just drops down and off
the screen. This is because the custom segue created earlier only applies to
the forward transition. To have the segue unwinding animation match the forward
segue, we will need to implement another custom segue that reverses what the
first segue does.
The Custom Unwind Segue
As with the first custom segue, create a new class inheriting from
UIStoryboardSegue. This time the perform method will render the opposite
animation and dismiss the second view controller.
// ABCustomUnwindSegue.m
- (void)perform
{
  UIView *sv = ((UIViewController *)self.sourceViewController).view;
  UIView *dv = ((UIViewController *)self.destinationViewController).view;

  UIWindow *window = [[[UIApplication sharedApplication] delegate] window];
  dv.center = CGPointMake(sv.center.x - sv.frame.size.width, dv.center.y);
  [window insertSubview:dv belowSubview:sv];

  [UIView animateWithDuration:0.4
    animations:^{
        dv.center = CGPointMake(sv.center.x,
				dv.center.y);
        sv.center = CGPointMake(sv.center.x + sv.frame.size.width,
				dv.center.y);
    }
    completion:^(BOOL finished){
        [[self destinationViewController]
			dismissViewControllerAnimated:NO completion:nil];
    }];
}
A few key differences to note here. We are inserting the destination view (the
first view) below the source view in the window this time so that the second
view which slid over top of the first view before now slides away revealing the
first view underneath.
To dismiss the second view after the animation, the
dismissViewControllerAnimated method is called on the destination view -
that is the first view.
Since the unwind segue has no class attribute in the attribute inspector, we
have to tell our storyboard about it some other way. Rather unintuitively, the
first view controller, the one we are unwinding to, will set the segue to use
for unwinding. This is done by overriding the
segueForUnwindingToViewController method.
// ViewController.m
#import "ABCustomUnwindSegue.h"

...

- (UIStoryboardSegue *)segueForUnwindingToViewController:(UIViewController *)toViewController
					       fromViewController:(UIViewController *)fromViewController
						           identifier:(NSString *)identifier {

	// Check the identifier and return the custom unwind segue if this is an
	// unwind we're interested in
    if ([identifier isEqualToString:@"UnwindFromSecondView"]) {
        ABCustomUnwindSegue *segue = [[ABCustomUnwindSegue alloc]
		                              initWithIdentifier:identifier
									              source:fromViewController
									         destination:toViewController];
        return segue;
    }

    // return the default unwind segue otherwise
    return [super segueForUnwindingToViewController:toViewController
			                     fromViewController:fromViewController
			                             identifier:identifier];
}
The call to the parent’s segueForUnwindingToViewController at the end is
critical if you want to mix custom segues with standard ones from XCode. For
built-in segues the parent UIViewController class will do the right thing and
return the correct unwind segue.
Conclusion
Congratulations, you should now have both the forward and reverse segues
working with custom animation. I’ve posted the complete, working sample project
with the code from this post on
github.
06 Dec 2013
I was struck by a recent article that describes
the effect of social media as such:
Talk to enough lonely people and you’ll find they have one thing in common:
They look at Facebook and Twitter the way a hungry child looks through a window
at a family feast and wonders, “Why is everyone having a good time except for
me?”
Loneliness, though, is not about friendship quantity so much as quality and
quality friendships require time, effort and intimacy to form.
Intimacy in relationships requires at least two things, trust and honesty, and
these are closely interrelated. To tell someone something very personal - to be
honest about it - I would have to trust that person to receive and handle the
information appropriately and with integrity. But before you trust the recipient,
you have to trust the medium. Facebook’s repeated attempts to make users’
profiles more public means that this is impossible.
So what do most people do with Facebook? The fact that major corporations start
and maintain their own Facebook profiles should give you the obvious answer -
perception management. When dealing with an information-leaking medium like
Facebook, that’s really all that’s left. The risk of future employers,
significant others, and friends seeing your dirty laundry means that only the
clean laundry makes the cut. The achievements, the grad photos, the new cars -
they’re up there. The tears, the struggles, the pain get left on the cutting
room floor.
Twitter, by the way, is no better for deep relationship building. However
Twitter has the decency to be honest about it. Facebook pretends to be about
friends when it’s really about managing your own image.
Alternatives?
Snapchat seems to be a popular thing. Maybe it’s because it allows, at least in
some small way, control over the spread of private information. Perception
management is no longer always the desired goal.
While there are open-source alternatives taking shape, the focus always seems
to be on the technology (often peer-to-peer) while otherwise aping Facebook’s
features. This now seems to be like the wrong approach to take. The focus
should be on making a better social network - one that encourages and
nurtures relationships instead of stunting them. What would that look like? I
don’t know, but I hope to see it in my lifetime.
18 Nov 2013
Up The Wall
The best climbs are the ones where it’s just me and the wall. Not in the
literal sense, of course, but if I can push out the distractions and just focus
on the wall things go better then expected. If I lose that concentration?
Things deteriorate quickly, my feet slip, I miss that next hold. Next thing I
know I’m still not up the damn wall and I’m tired from trying.
I’m noticing that the same is true in general - lack of focus eats away at my
time. Not in a big way, mind you, but around the edges. Things start to get
sloppy: I spend half an hour reading some useless Hacker News post; watch some
5 minute Youtube clip for no discernible reason. Suddenly the day feels
shorter. Where did all that time go? Oh, fuck.
This is the default.
When climbing I sometimes stop, just stare at the wall, and tell myself:
“Focus, focus, focus.” The very act of saying it pushes random thoughts out, at
least for a little bit. Then I have to stop again.
“Focus, focus, focus.”
It’s the Little Things
Losing focus is easy, it’s the little things that do it. You spot a familiar
face, “Oh hey, I haven’t seen him around here in a while”, and so the mind
starts to drift. It’s only natural. This reflex needs to shut down with force!
Progress doesn’t happen when I’m thinking about random trivia, or politics,
or ruminating about the future. These are all activities with zero return on
effort invested. But they’re so damn easy. But they’re so damn unimportant.
So now it’s like a mantra: “Focus, focus, focus”.
Every day “Focus, focus, focus.”
06 Nov 2013
Introduction
This is a hack I did for the inagural Night\Shift event in Kitchener, Ontario. A friend conceived of a wonderful display for Night\Shift, my role was to add a bit of technology to the mix.
The Kinect was meant to replicate the experience of walking through the cards,
but in a more abstract/virtual space. The Kinect detects users passing through
it’s FOV and converts them to silhouettes that then interact with the physics
simulation of the hanging cards.
The Inspiration
The original idea for the Kinect display came from
this
Kinect hack. The goal was to have something similar that would capitalize on the
night environment and setting of Night/Shift and tie it to the idea of Let’s Connect.
Unfortunately, this Kinect hack is scant on details. The developer’s website
talks about the purpose of the project, but omits the technical details needed
to make it work. Some googleing eventually led to
this
tutorial for converting a Kinect user into a silhouette and interacting with
simulated objects on-screen. This became the starting point.
Technical Hurdles
While installing the OpenNI drivers and
processing 2.1 was fairly
straightforward, trouble started when attempting to use SimpleOpenNI. Attempts
to run a basic sketch with SimpleOpenNI resulted in the following error:
Can't load SimpleOpenNI library (libSimpleOpenNI64.so) : java.lang.UnsatisfiedLinkError: /home/alex/sketchbook/libraries/SimpleOpenNI/library/libSimpleOpenNI64.so: libboost_system.so.1.54.0: cannot open shared object file: No such file or directory
Oops.
$ apt-cache search libboost-system
libboost-system-dev - Operating system (e.g. diagnostics support) library (default version)
libboost-system1.46-dev - Operating system (e.g. diagnostics support) library
libboost-system1.46.1 - Operating system (e.g. diagnostics support) library
libboost-system1.48-dev - Operating system (e.g. diagnostics support) library
libboost-system1.48.0 - Operating system (e.g. diagnostics support) library
Turns out that Ubuntu 12.04 only ships with libboost-system up to 1.48.
After some unsuccessful attempts to get libboost-system 1.54 installed - including nearly breaking my system by screwing up apt dependencies - I finally found an inelegant, but working solution.
# ln -s /usr/lib/libboost_system.so.1.46.1 /usr/lib/libboost_system.so.1.54.0
I guess this library’s ABI hadn’t changed in any way that mattered to SimpleOpenNI between versions. Good thing, too.
The Code is Out of Date
Next I tried to run the code in the first part of the silhouttes tutorial. No such luck.
The function enableScene() does not exist.
A little more googling revealed that the SimpleOpenNI API had changed and the
tutorial was out of date. Apparently enableScene and sceneImage functions
were now enableUser and userImage. Unfortunately simply replacing one with
the other did not fix the problem. Instead enableUser returned an error.
After some more fiddling, it seems as though the depth image needs to be
enabled before you can enable the user image. Adding enableDepth to setup()
allowed enableUser to complete successfully.
Progress
At this point I was able to get the user image and display it on-screen. It
looked something like this.
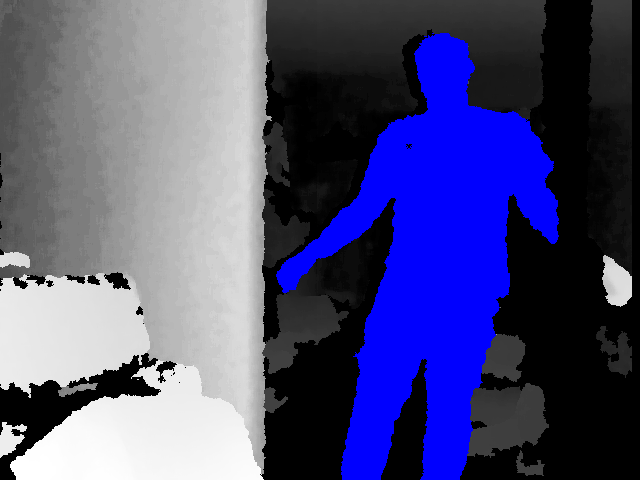
The problem here is that the user image (blue silhouette) is mixed in with the
depth image (greyscale). The only way to get rid of the depth image seemed to
be to disable it, but this broke the user image in the process. After
examining the SimpleOpenNI code and failing to find a solution, I used a
brute-force approach.
cam = context.userImage();
  cam.loadPixels();
  color black = color(0,0,0);
  // filter out grey pixels (mixed in depth image)
  for (int i=0; i<cam.pixels.length; i++)
  {
    color pix = cam.pixels[i];
    int blue = pix & 0xff;
    if (blue == ((pix >> 8) & 0xff) && blue == ((pix >> 16) & 0xff))
    {
      cam.pixels[i] = black;
    }
  }
  cam.updatePixels();
Since the depth image is purely greyscale, filtering out all pixels where the
red, green, and blue channels were identical left me with just the user image.
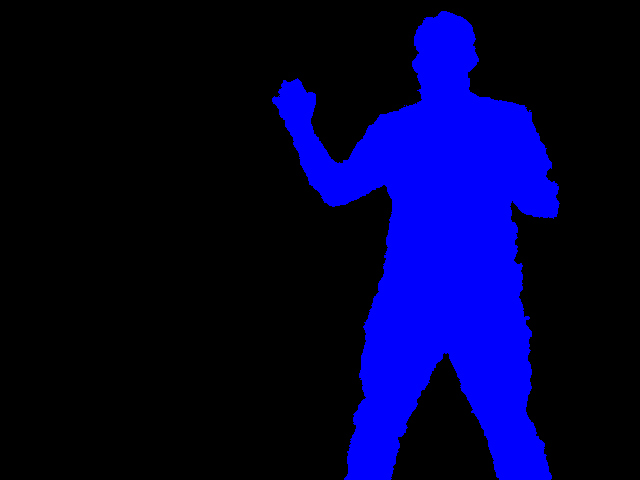
At this point I was able to reproduce the demo in the tutorial - with polygons
falling from the sky and interacting with the user’s silhouette.
Adding the Cards
As mentioned in the introduction, the purpose of this hack was to create a
virtual representation of the Let’s Connect installation. This meant that the
polygons in the scene should look and act like the physical cards. Since the tutorial used PBox2D for running the physics simulation of the polygon interactions, I decided to modify the polygon code in the tutorial for my purposes.
Step one was modifying CustomShape class to always draw a card-shaped polygon
at the chosen location instead of randomizing what is drawn. The makeBody
method was modified like so.
void makeBody(float x, float y, BodyType type) {
    // define a dynamic body positioned at xy in box2d world coordinates,
    // create it and set the initial values for this box2d body's speed and angle
    BodyDef bd = new BodyDef();
    bd.type = type;
    bd.position.set(box2d.coordPixelsToWorld(new Vec2(x, y)));
    body = box2d.createBody(bd);
    body.setLinearVelocity(new Vec2(random(-8, 8), random(2, 8)));
    body.setAngularVelocity(random(-5, 5));

    // box2d polygon shape
    PolygonShape sd = new PolygonShape();
    toxiPoly = new Polygon2D(Arrays.asList(new Vec2D(-r,r*1.5),
                                           new Vec2D(r,r*1.5),
                                           new Vec2D(r,-r*1.5),
                                           new Vec2D(-r,-r*1.5)));

    // place the toxiclibs polygon's vertices into a vec2d array
    Vec2[] vertices = new Vec2[toxiPoly.getNumPoints()];
    for (int i=0; i<vertices.length; i++) {
      Vec2D v = toxiPoly.vertices.get(i);
      vertices[i] = box2d.vectorPixelsToWorld(new Vec2(v.x, v.y));
    }
    // put the vertices into the box2d shape
    sd.set(vertices, vertices.length);
    // create the fixture from the shape (deflect things based on the actual polygon shape)
    body.createFixture(sd, 1);
  }
Instead of using toxiclibs to build a polygon from an appropriately shaped
ellipse, this sets the four vertices of the polygon by hand. The result is
rectangle whose length is about 1.5 times its width.
Another key change was setting bd.type to a dynamic value passsed in at
creation. This allows static (not moving) polygons to be created, which will
serve as the anchors for each string of simulated cards.
A String of Cards
With the ability to draw single cards, it was time to put multiple cards
together into a string. To connect the cards I used PBox2D distance joints
between each card. The joints were attached off-center on each card to keep the
cards lined up vertically once gravity was applied.
To keep things simple, a function was used to create a single string
(top to bottom).
void drawString(float x, float size, int cards) {

  float gap = kinectHeight/cards;
  CustomShape s1 = new CustomShape(x, -40, size, BodyType.STATIC);
  polygons.add(s1);

  CustomShape last_shape = s1;
  CustomShape next_shape;
  for (int i=0; i<cards; i++)
  {
    float y = -20 + gap * (i+1);
    next_shape = new CustomShape(x, -20 + gap * (i+1), size, BodyType.DYNAMIC);
    DistanceJointDef jd = new DistanceJointDef();

    Vec2 c1 = last_shape.body.getWorldCenter();
    Vec2 c2 = next_shape.body.getWorldCenter();
    c1.y = c1.y + size / 5;
    c2.y = c2.y - size / 5;
    jd.initialize(last_shape.body, next_shape.body, c1, c2);
    jd.length = box2d.scalarPixelsToWorld(gap - 1);
    box2d.createJoint(jd);
    polygons.add(next_shape);
    last_shape = next_shape;
  }
}
Note that the first polygon is of type BodyType.STATIC and is drawn
off-screen. This polygon is used as the anchor for the string. The remaining
polygons are dynamic and attached to each other as described previously. The
spacing between polygons is chosen based on the height of the Kinect image and
the number of polygons that are in the string.
Multiple strings were drawn by calling drawString repeatedly.
float gap = kinectWidth / 21;
  for (int i=0; i<20; i++)
  {
    drawString(gap * (i+1), 2, 10);
  }
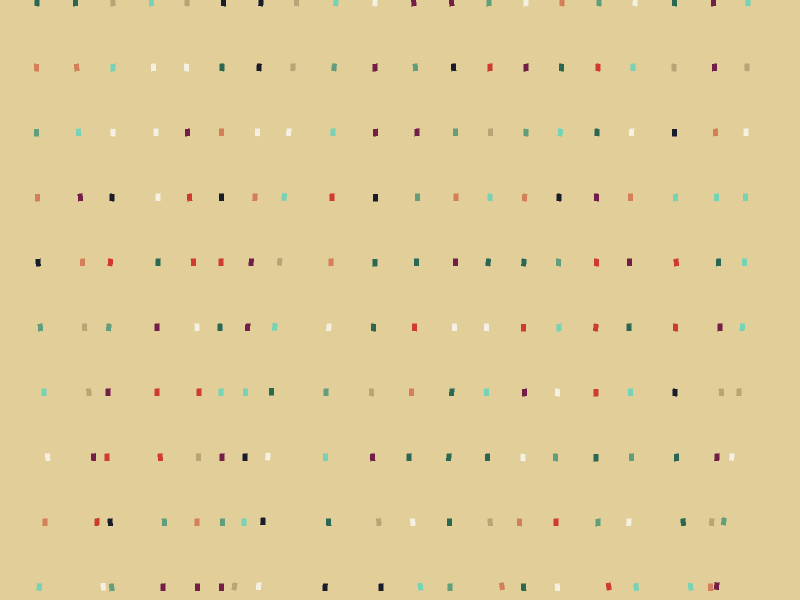
The result looked like this.
Putting it All Together
With the user image issues resolved and the cards hanging, passersby at
Night\Shift could now interact with the virtual cards on the display as they
walked by.

A video with the Kinect hack in action can be found on vimeo.
Overall, the night was a huge success, a big thanks to @kymchiho
and Chris Mosiadz for the inspiration and making the rest of Let’s Connect
possible. I think everyone involved had a great time!
The complete code for this Kinect hack can be found on my Github account.


