Custom iOS Segues in XCode 5
07 Feb 2014iOS Segues are an elegant solution to implementing animated transitions between storyboard views in an iOS application. When using the standard segues they allow beautiful transitions with zero code. But What if you want a different animation or behavior in the segue?
Custom segues to the rescue! Unfortunately I’ve had a hard time finding tutorials that cover using custom segues end-to-end (i.e. triggering the segue, loading the new view, and finally unwinding). This post aims to remedy that a bit in addition to providing a few tricks for working with segues.
First Thing’s First
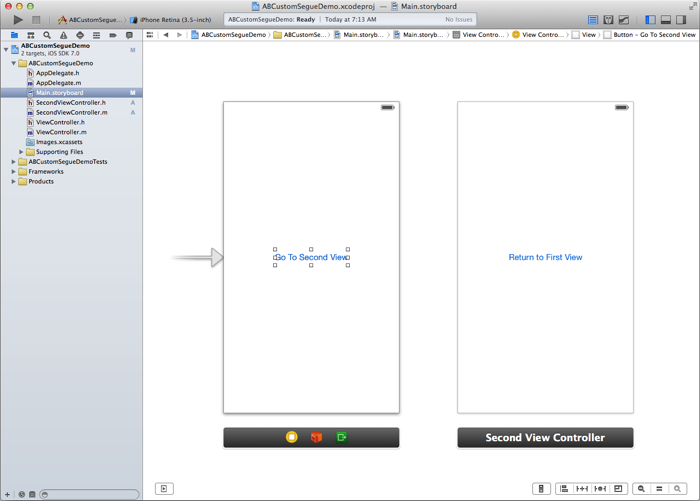
Let’s start with a simple XCode project with two view controllers. Create a
new “Single View Application” and add a second view controller class using
File->New->File.... The new class should inherit from UIViewController. A
second view controller also needs to be added to the app’s storyboard and its
Class property set to the name of the new class (SecondViewController).
Since we need something to click/tap on, add a simple button to each view controller as well.
The Custom Segue
Next, the custom segue itself needs to be created. Once again, we can add a new
class for the custom segue using File->New->File... in XCode. This time the
class should inherit from UIStoryBoardSegue.
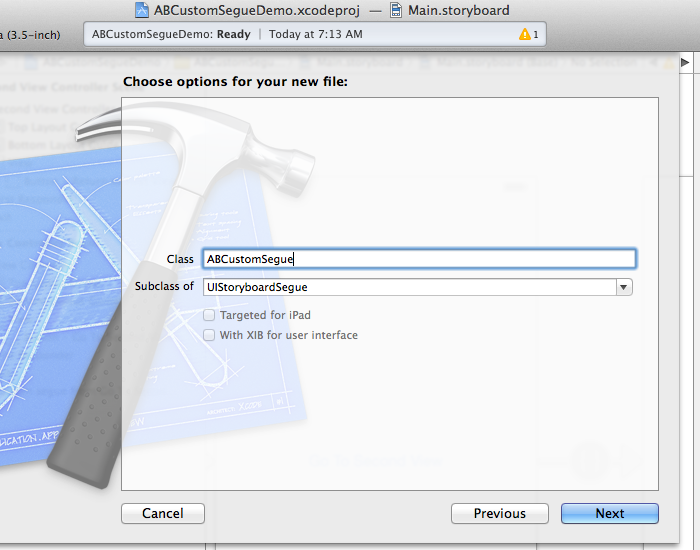
In general only the perform method needs to be implemented in a custom segue.
If you want the segue to carry some data, properties may be added as well.
For our purposes, this segue will simply implement a custom slide animation.
// ABCustomSegue.m
- (void)perform
{
  UIView *sv = ((UIViewController *)self.sourceViewController).view;
  UIView *dv = ((UIViewController *)self.destinationViewController).view;

  UIWindow *window = [[[UIApplication sharedApplication] delegate] window];
  dv.center = CGPointMake(sv.center.x + sv.frame.size.width,
          dv.center.y);
  [window insertSubview:dv aboveSubview:sv];

  [UIView animateWithDuration:0.4
    animations:^{
        dv.center = CGPointMake(sv.center.x,
                dv.center.y);
        sv.center = CGPointMake(0 - sv.center.x,
                dv.center.y);
    }
    completion:^(BOOL finished){
        [[self sourceViewController] presentViewController:
			[self destinationViewController] animated:NO completion:nil];
    }];
}
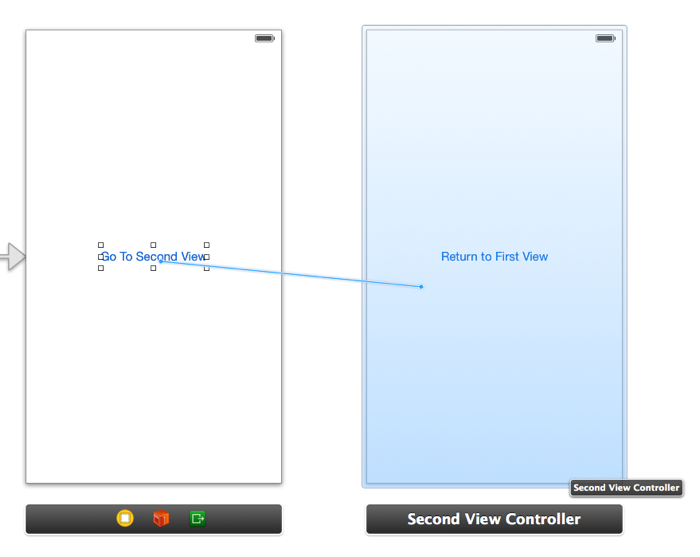
Pretty straightforward. Now it’s just a matter of adding the segue to the storyboard. This can be done in the usual way - by Ctrl dragging from the button that triggers the segue to the second view controller.
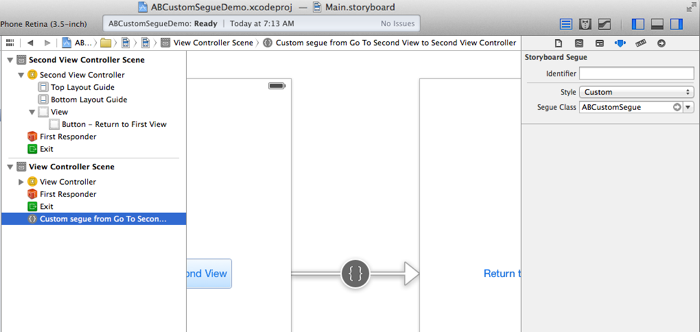
Finally the segue needs to be configured to use our custom class. This is done from the attribute inspector for the segue. Set the Style to Custom and set the Segue Class to the name of our new segue.
You can now test the segue by tapping on the “Go To Second View” button. The second view should slide in from the right.
Unwinding the Segue
To return to the first view from the second view, we have to unwind the segue. As an extra challenge, let’s do it programatically.
Before we can unwind, the first view controller needs to implement a handler for returning from the second view.
// ViewController.h
- (IBAction)returnedFromSegue:(UIStoryboardSegue *)segue;
// ViewController.m
- (IBAction)returnedFromSegue:(UIStoryboardSegue *)segue {
NSLog(@"Returned from second view");
}Next we need to create the unwind segue. Since we want to trigger this segue programatically, we’re not going to Ctrl drag from the “Return…” button to “Exit” as we usually would. Instead we will Ctrl drag from the second view controller to “Exit”. This rather unintuitive method for creating an unwind segue is useful to know when the segue is not going to be connected to any UI controls directly but is being triggered only programatically.
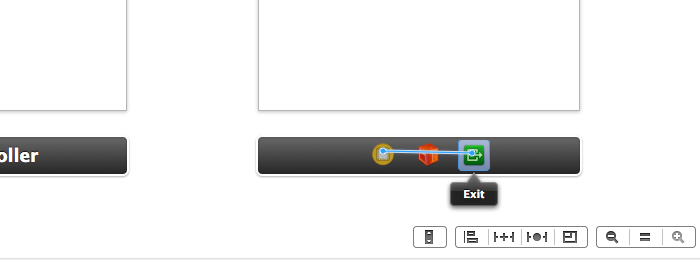
You will see the usual popup asking you to select a handler for the unwind.
Select the returnedFromSegue method we just created.
To trigger the unwind programatically we need to give the unwind segue an identifier. Select the unwind segue in the storyboard and set the identifier to “UnwindFromSecondView”.
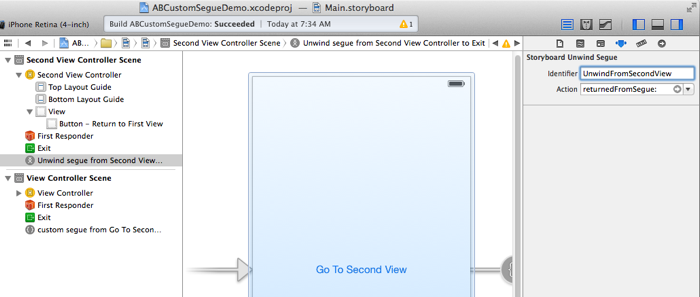
Next create an action for the “Return to First View” button. Ctrl drag from the
button to somewhere in the SecondViewController.m file (the Assistant
editor is useful here) and create an action called returnToFirst. The
implementation of this action is very short and simply invokes the unwind segue
created above.
// SecondViewController.m
- (IBAction)returnToFirst:(id)sender {
    [self performSegueWithIdentifier:@"UnwindFromSecondView" sender:self];
}
At this point you should be able to segue to the second view and back again using the buttons. Note however that the unwind segue does not slide the second view back to the right nicely. Instead the second view just drops down and off the screen. This is because the custom segue created earlier only applies to the forward transition. To have the segue unwinding animation match the forward segue, we will need to implement another custom segue that reverses what the first segue does.
The Custom Unwind Segue
As with the first custom segue, create a new class inheriting from
UIStoryboardSegue. This time the perform method will render the opposite
animation and dismiss the second view controller.
// ABCustomUnwindSegue.m
- (void)perform
{
  UIView *sv = ((UIViewController *)self.sourceViewController).view;
  UIView *dv = ((UIViewController *)self.destinationViewController).view;

  UIWindow *window = [[[UIApplication sharedApplication] delegate] window];
  dv.center = CGPointMake(sv.center.x - sv.frame.size.width, dv.center.y);
  [window insertSubview:dv belowSubview:sv];

  [UIView animateWithDuration:0.4
    animations:^{
        dv.center = CGPointMake(sv.center.x,
				dv.center.y);
        sv.center = CGPointMake(sv.center.x + sv.frame.size.width,
				dv.center.y);
    }
    completion:^(BOOL finished){
        [[self destinationViewController]
			dismissViewControllerAnimated:NO completion:nil];
    }];
}
A few key differences to note here. We are inserting the destination view (the first view) below the source view in the window this time so that the second view which slid over top of the first view before now slides away revealing the first view underneath.
To dismiss the second view after the animation, the
dismissViewControllerAnimated method is called on the destination view -
that is the first view.
Since the unwind segue has no class attribute in the attribute inspector, we
have to tell our storyboard about it some other way. Rather unintuitively, the
first view controller, the one we are unwinding to, will set the segue to use
for unwinding. This is done by overriding the
segueForUnwindingToViewController method.
// ViewController.m
#import "ABCustomUnwindSegue.h"

...

- (UIStoryboardSegue *)segueForUnwindingToViewController:(UIViewController *)toViewController
					       fromViewController:(UIViewController *)fromViewController
						           identifier:(NSString *)identifier {

	// Check the identifier and return the custom unwind segue if this is an
	// unwind we're interested in
    if ([identifier isEqualToString:@"UnwindFromSecondView"]) {
        ABCustomUnwindSegue *segue = [[ABCustomUnwindSegue alloc]
		                              initWithIdentifier:identifier
									              source:fromViewController
									         destination:toViewController];
        return segue;
    }

    // return the default unwind segue otherwise
    return [super segueForUnwindingToViewController:toViewController
			                     fromViewController:fromViewController
			                             identifier:identifier];
}
The call to the parent’s segueForUnwindingToViewController at the end is
critical if you want to mix custom segues with standard ones from XCode. For
built-in segues the parent UIViewController class will do the right thing and
return the correct unwind segue.
Conclusion
Congratulations, you should now have both the forward and reverse segues working with custom animation. I’ve posted the complete, working sample project with the code from this post on github.